Landscape Tiler
Last week, MadeWithDefold Jam 2023 finished. This one happens every year, thanks to the enthusiasm and efforts of @paweljarosz.
When the theme “Infinite Gameplay” was decided by voting, at first I thought that any endless runner would be perfect. But it’s possible to lose in a runner, which contradicts infinity. I remembered about idle games, where you can’t lose, but there is no infinity - the game goes on a pre-defined progression. So where is there no progression and you can’t lose? Maybe in meditative-creative builders?
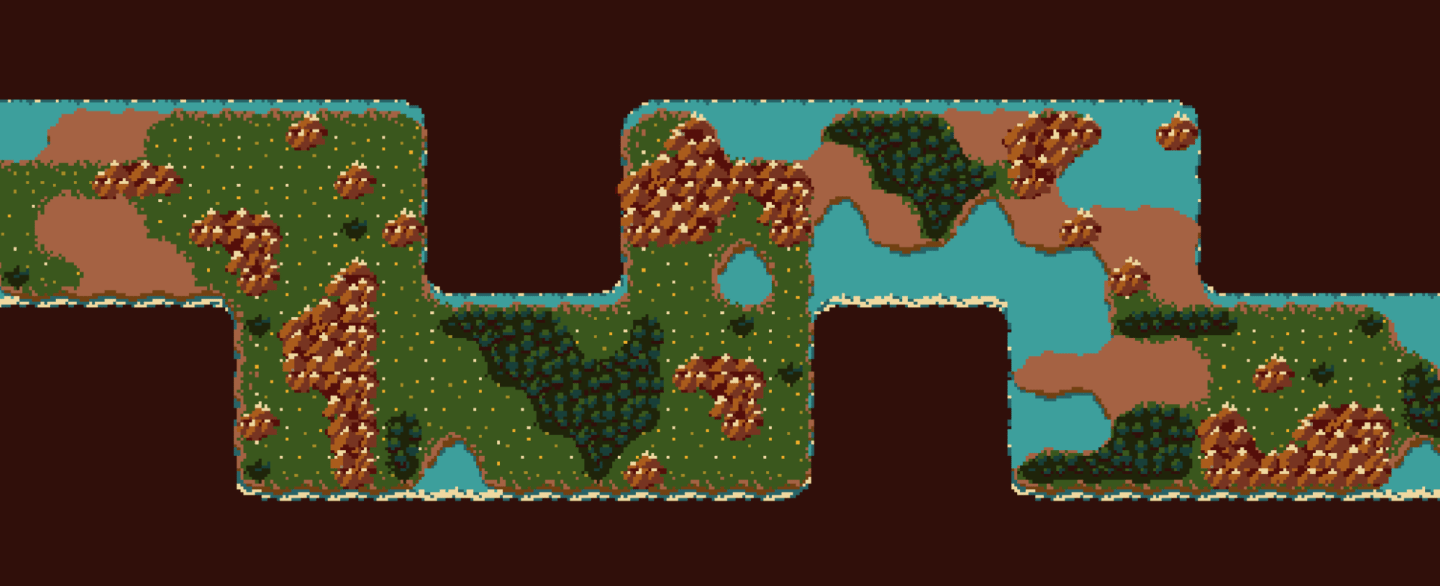
I started going through my idea chest and found the mechanics of connecting land chunks, similar to what happens in board games like Carcassonne or Civilization. I immediately had a picture in my head of an endless builder in the manner of Townscaper or Dorfromantik. Plans were big, of course. Roads, villages, little people going about their business, economic processes, ships crossing the sea, the change of day and night…
Screenshot of the jam version on Itch.io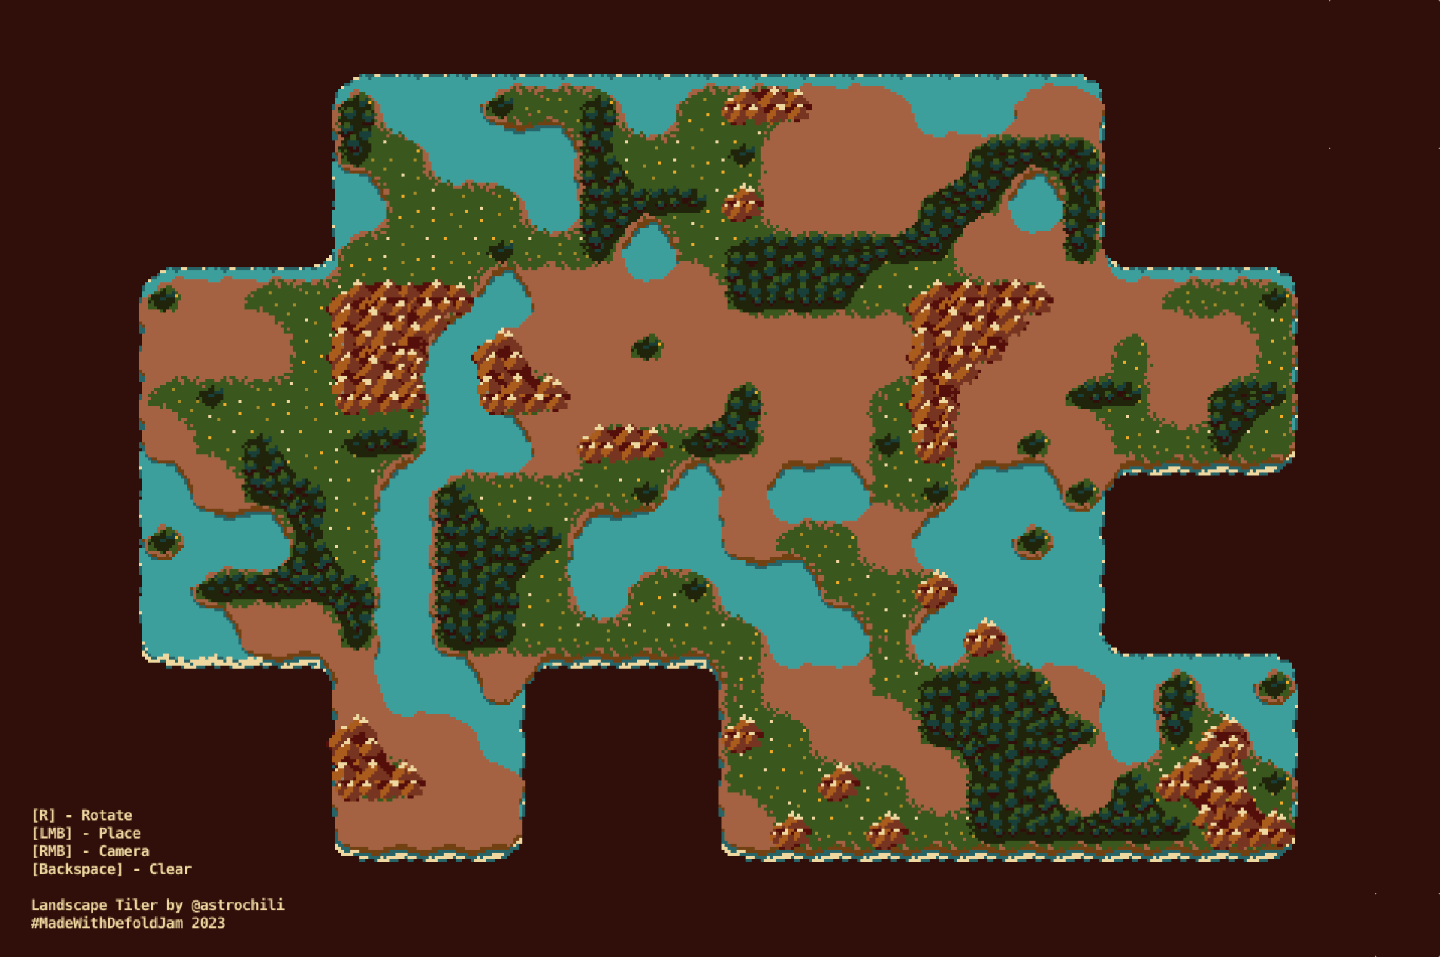
Of course, as the jam progressed, the scope began to shrink rapidly. I decided to do as little as was still possible to do with a high enough quality. So I got a simple auto-tiling mechanics with nice visual and sound accompaniment.
First of all, if you haven’t seen my submission, I invite you to play it.
Graphics
There are only three graphic styles in which my drawing skills are a little above the floor - the ink pen, the custom interfaces in Figma and the micro pixel art. It’s to long to draw with an ink pen, user interfaces are not relevant here, so I opened Aseprite and started experimenting with its beta feature Tilemap Layers. Awesome tool, highly recommend to try it.
I chose a ready-made palette Fantasy 24, which I intuitively liked. A little magic and 24 burned colors, of which only 16 have been used so far.
Aseprite and a tile set at the end of the 2th day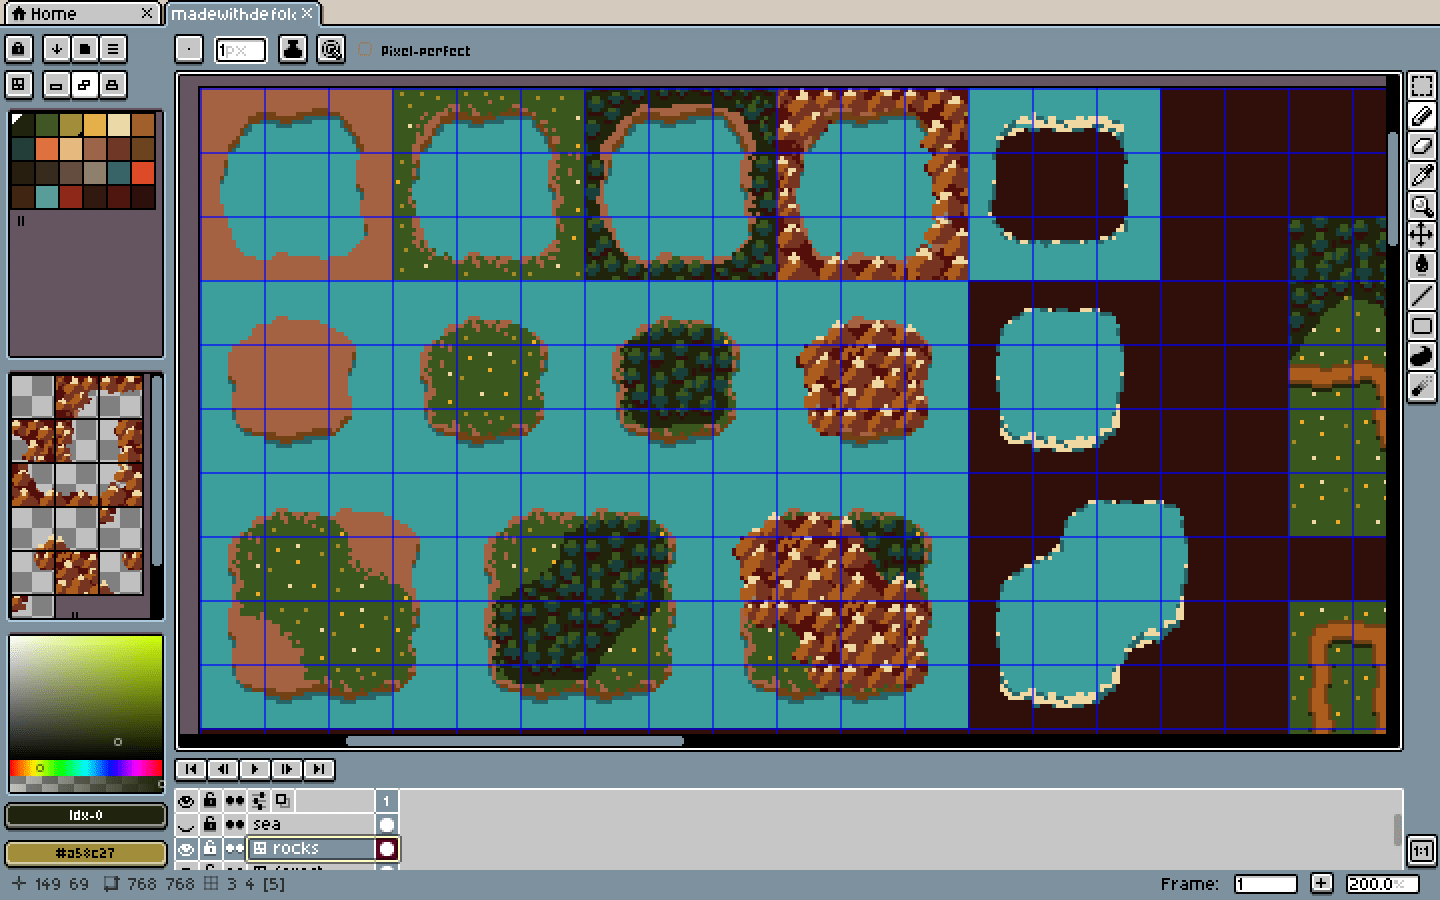
And so, step by step, drawing with my finger on the macbook’s touchpad, the second day of the jam resulted in a tile set. The tiles used in the jam version are the same as they were originally painted, there is no such neatness here. But I think a little bit of nice pixel art magic is going on here.
To avoid wasting time on transitions between biomes, I tried to draw the tiles in such a way that I can layer them on top of each other. As a basis - water, on top of water - ground, on the ground — grass, on the grass - forest or mountains. I also made a sketch of roads and rivers to place them on the ground and grass, but I didn’t have time to include them in the game.
Model
What is the game world in Landscape Tiler in terms of model? It’s a grid of integer coordinates on which you can place chunks, connecting them to each other without any special rules. Each chunk consists of layers of biomes. Each layer is a grid of 4x4 binary values which answer the question if a biome is present in a given node or not.
The player places the first chunk on the map, after which a new chunk is generated in the hand. Chunk generation is very simple so far. Three biomes are randomly determined, and then, just as randomly, binary node values are placed in those biomes. The only nuance is that the biomes have dependencies, for example, a node in the forest biome automatically sets nodes in the grass and earth biomes.
I gave up on any rules for joining chunks to each other, as implemented in the Carcassonne board game, because I didn’t have enough time to balance them. Representing chunks as nodes, rather than tiles, automatically allows to visualize the joining of any side of the chunks using auto-tiling.
Auto-tiling
Many articles have been written about auto-tiling (example 1, example 2). They explain the method of using bitmasks, which allows you to determine the tile index quite cheaply based on corner values.
Convert corner values to tile indexes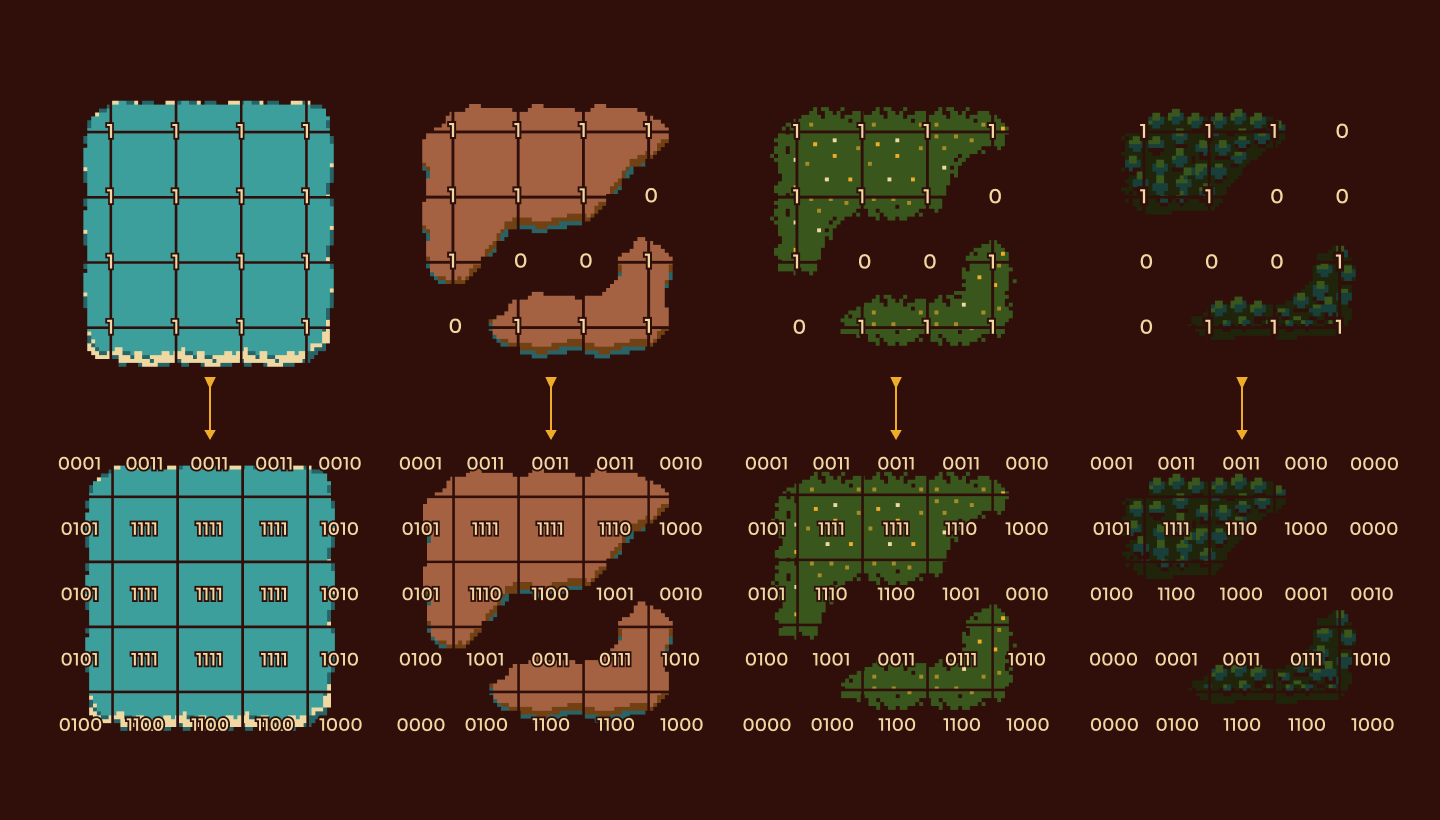
The auto-tiling algorithm is simple. The four corners of the tile is represented as binary values, which, when converted to a decimal number, form the index of the tile from 1 to 16. And because I use biomes as layers, the 0 and 1 values in my case is the absence and presence of the biome.
With one or two biomes this technique works great. How to use bitmasks if there are more than two biomes in a tile, I still imagine poorly. Perhaps to use numbers that have a different number notation.
The grid of biomes turns into a tile set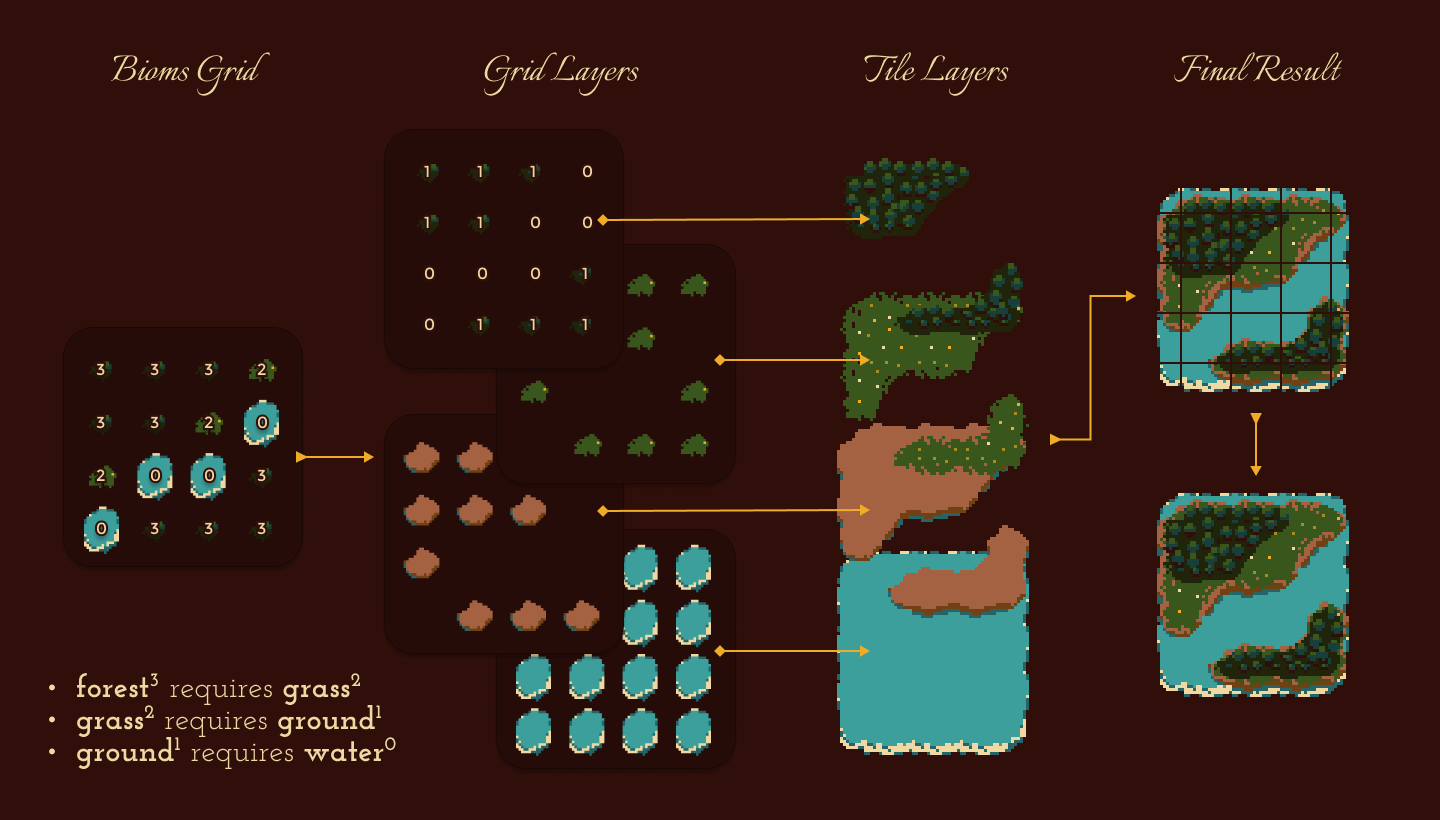
The first tile in my tile set is missing, because according to the logic of the layers, the first tile is the absence of biome (0000). But why waste an empty place, if it can be occupied by an additional variation of the filled tile (1111)? And when accessing the tile with the index 16 randomly choose between the tile 1 and 16? But honestly, as you can see, I didn’t even draw it, so it’s more like an idea.
Tiles are sorted so that it’s effective to read them by bitmask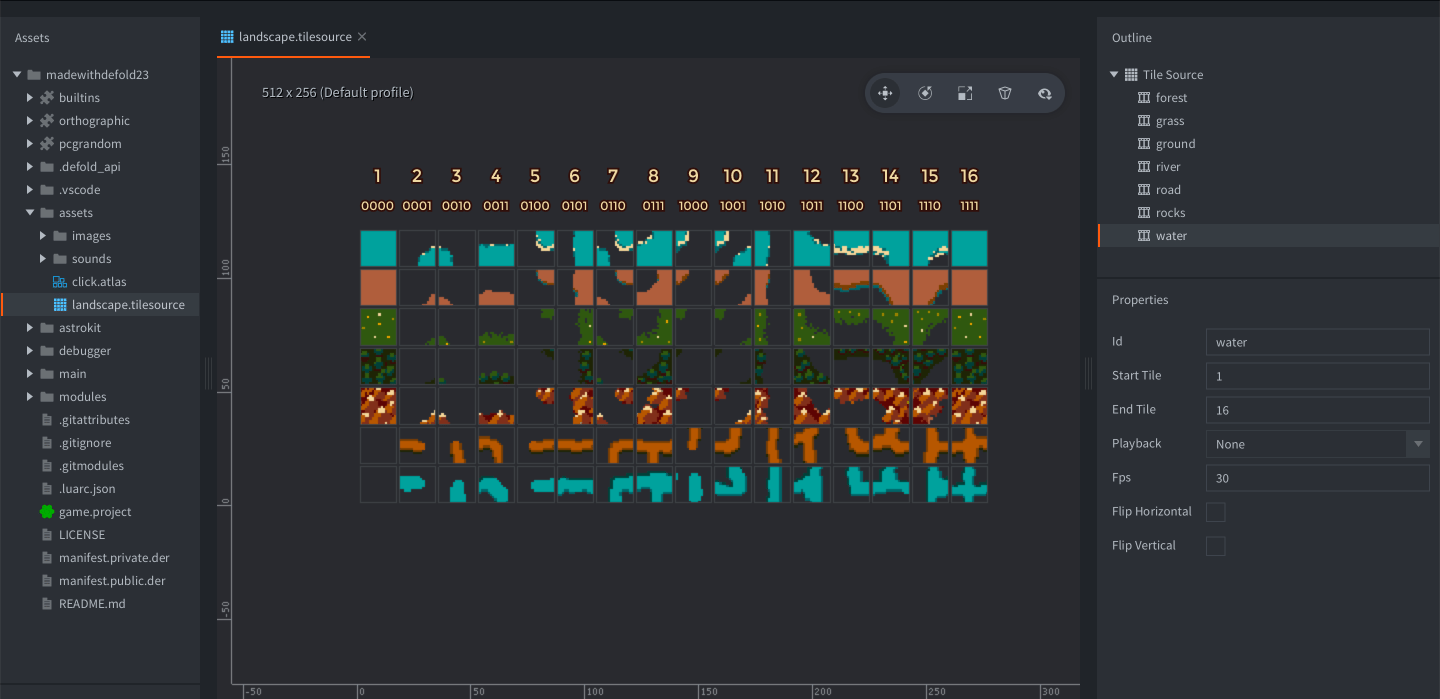
All the tiles are presented in one file landscape.tilesource. For the convenience of finding a tile by index, I combined each biome into an animation of 16 frames with playback turned off. Defold allows you to set the animation cursor programmatically, which is what I use to set the tile in the sprite component.
go.set(sprite_url, 'cursor', (tile_index - 1) / 15)
Following the auto-tiling algorithm, each grid of 4x4 biome nodes turns into a grid of 5x5 tiles, where the edge tiles are docking tiles to the nodes of neighboring chunks.
In the following code example I removed all unnecessary things about the docking of the chunks and the logic of choosing between the 1 and 16 tiles to draw your attention to how simple this algorithm really is in its pure form.
local table_concat = table.concat
local table_empty = {}

---Create an empty grid with the same values
---@param size number Width and height of the grid
---@param value any A value to set
---@return table 2-dimensional array with the same values
local function init_grid(size, value)
  local grid = {}

  for x = 1, size do
    local col = {}

    for y = 1, size do
      col[y] = value
    end

    grid[x] = col
  end

  return grid
end

---Create a tile grid based on the node grid
---@param node_grid table 2-dimensional array with node values 0 and 1
---@return table 2-dimensional array with tile indexes from 1 to 16
local function autotile_grid(node_grid)

  -- The tile grid is larger than the node grid by one value
  -- For example, 4x4 -> 5x5
  local tile_grid = init_grid(#node_grid + 1, 0)

  for x = 1, #tile_grid do
    for y = 1, #tile_grid do

      -- Get the tile corners based on the grid nodes values
      local corners = {
        (node_grid[x - 1] or table_empty)[y - 1] or 0,
        (node_grid[x] or table_empty)[y - 1] or 0,
        (node_grid[x - 1] or table_empty)[y] or 0,
        (node_grid[x] or table_empty)[y] or 0
      }

      -- Convert a bitmask to the tile index from 1 to 16
      tile_grid[x][y] = 1 + tonumber(table_concat(corners), 2)
    end
  end

  return tile_grid
end
Scene
Each tile in the game scene is a gameobject with a sprite component. Not very optimal for layering tiles on top of each other, because I get about 80-100 objects per chunk.
So it’s better to optimize this by using a tilemap component for each biome instead of sprites. Additionaly you can have one tilemap component for each biome for the entire map. And for even greater optimization, multilayer tiles should be baked into the tilesource in advance and end up working with only two tilemap components on the scene - the game map and the chunk in the hand.
Chunk game object in Defold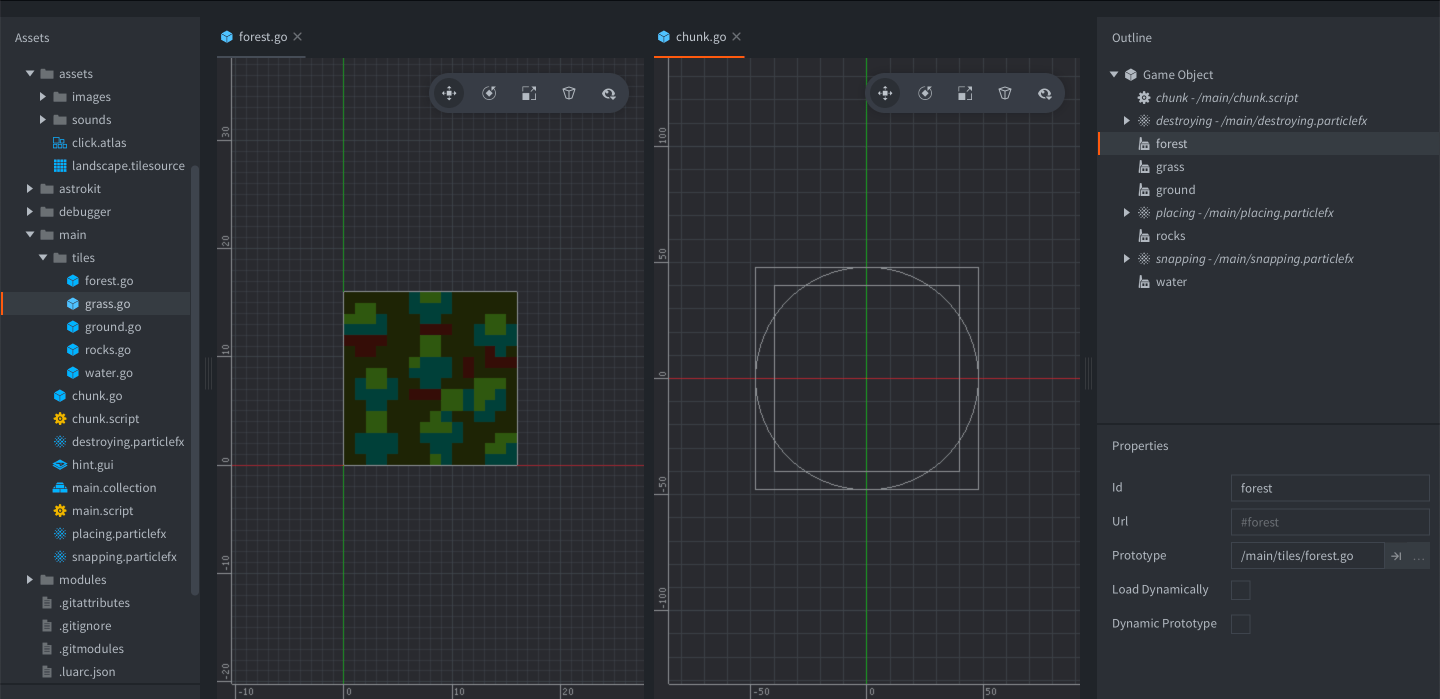
Each chunk contains biome factories, with which it creates instances of tiles. I wanted to use one factory for all biomes, in the runtime to set the biome type and tile. But ran into the fact that after changing the animation of a sprite component, setting the animation cursor stops working if that animation has playback turned off.
When the chunks are docking, redrawing and a new generation of tiles takes place. When creating tiles, the chunk script takes into account the edge nodes of 8 neighboring chunks in order to perform a correct auto-tiling.
Right now it re-creates all the tiles, which leads to lags when there are a large number of chunks in the scene. This is easily fixed by redrawing only the chunks affected by docking.
One of the tetramino figures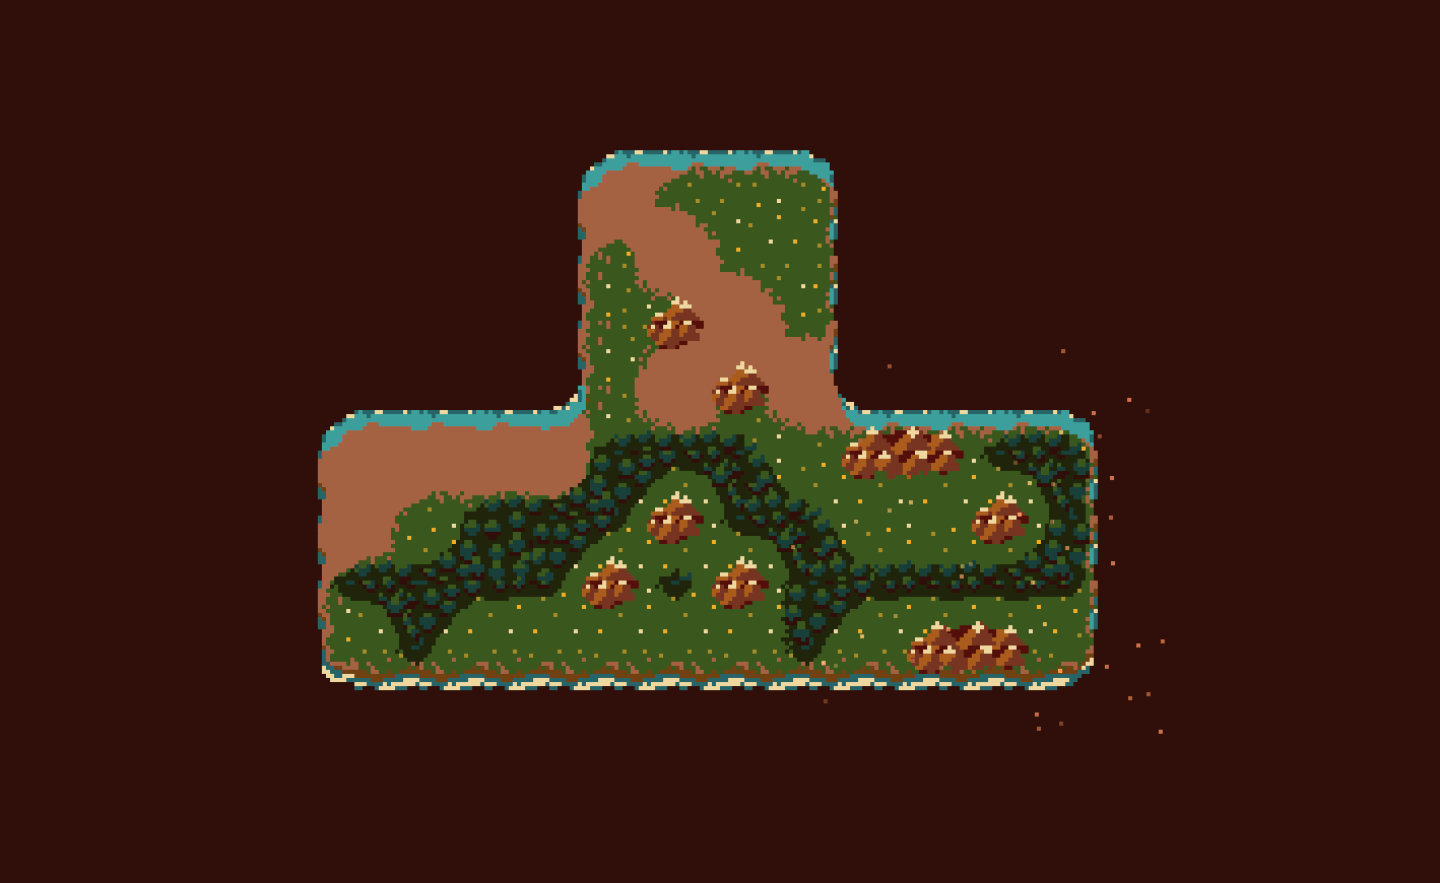
Nice Trivia
The small pollen flying over the chunk is a particle system using a simple white pixel. Different directionality and emitter speed when docking the chunk, placing it, and destroying it. Minimalist, cheap, beautiful.
On the last day of the jam, I seriously considered writing game music and sounds. I had Model Samples waiting for me, stuffed with select samples, and a creative evening on the balcony.
Elektron Model Samples on another day and for another game
But before that, for a test, I plugged in the ready-made sounds from my previous work, Cat’s Day. And they fit so well that in a couple of minutes they completely closed the sound issue for the jam.
Further recording of the gifs, screenshots, submitting an entry, writing posts on social networks - all that took quite a lot of time to still have time to create a quality sound from scratch. Some would say to use assets, but no, I always prefer to make sound myself, since sound design is one of my hobbies.
Dependencies
I used the defold-orthographic library to work with the camera and convert the screen coordinates to the game world.
Also, I found that the way of generating random numbers, which I used before
-- Don't do it on HTML5!
math.randomseed(os.clock() * 10000000)
_ = math.random()
_ = math.random()
_ = math.random()
was practically useless in HTML5, so I used the defold-random library.
Zed Editor
In the middle of a jam I found a new code editor Zed, which has almost everything I need to develop in Lua, except a debugger. It includes out of the box Lua Language Server and all the associated benefits. I’m waiting they add support for language settings for custom file extensions, so it will be possible to work with *.script files and other variations by Defold, containing Lua code.
Landscape Tiler project in Zed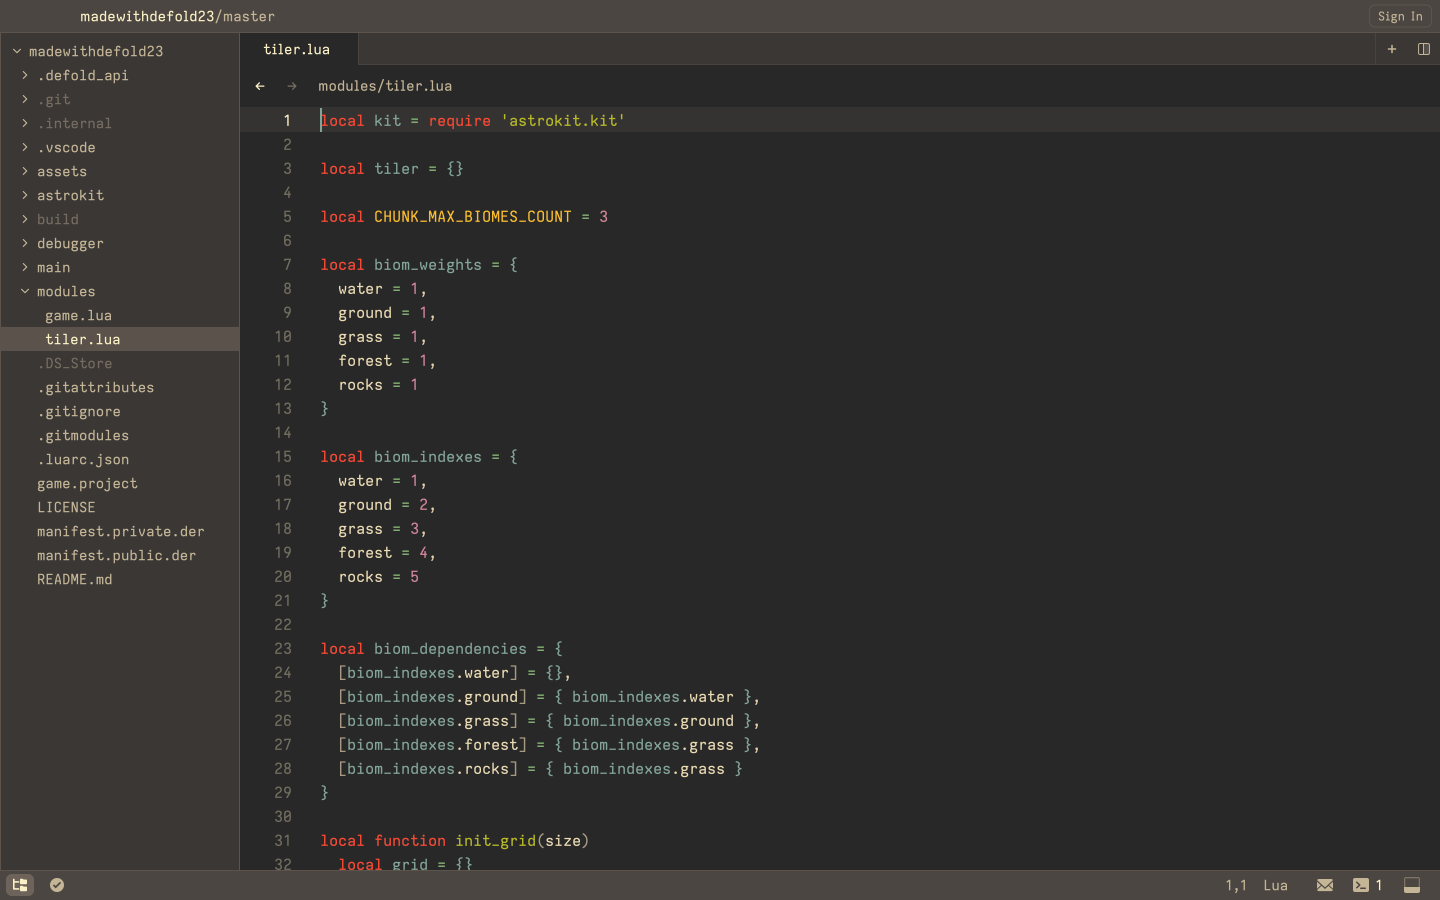
But during the last days of the jam, my speedy development got me into a tangle of code that I was no longer able to debug with just the print() command, so I had to go back to VSCode to debug with breakpoints.
Time
The jam lasted eight days. I promised to count game development time, but that rule broke during the gamejam.
- May 8. Looking for ideas, collecting references.
- May 9. Creating a tile set in Aseprite.
- May 10. Nothing (editor Zed has my full attention).
- May 11. Nothing (realized it’s time to cut the scopes).
- May 12. First chunk and auto-tiling, chunk rotation.
- May 13. Docking the chunks with each other.
- May 14. Auto-tiling between the chunks, map cleaning.
- May 15. Particle systems, sound, submitting, social media.
After jam:
- May 16. Playing games by other participants and rating.
- May 21. Writing this post.
- May 22. Writing this post.
During the jam I usually spent 4 to 6 hours in the evenings, from dusk to late afternoon. With an abstract estimate it turns out to be about 30 hours for the jam, 6 hours for playing and about 12 hours for this post.
Results
Landscape Tiler didn’t take first places in the overall category, which is fair, because it’s not even a game. The winners made real games, which I think are rightly worthy of these places. The most striking thing is that the first two places made by developers who have never made a game on Defold before!
Nevertheless, I managed to take #1 in the Presentation category 🎉.